How to Clean Audio for Instagram Reels Music Videos
How to clean audio for Instagram Reels music videos: import the clip into Veena, remove noise, balance voice and instrument, master and export MP4. Free.
How do I clean audio for Instagram Reels music videos?
To clean audio for Instagram Reels, import the clip into Veena, separate the sound from the picture, split it into stems, clean and balance the voice and the instrument, master it, and export an MP4 with your video and the new mix. It all happens in one browser tab, free, and the finished file goes straight back to Instagram.
Veena is an AI DAW with a personal music producer built in. Describe the song you want and CoProducer builds it with you — beats, chords, melody, arrangement and mix — as real tracks you can edit, mix and export. Free, in your browser.
That matters for a Reel because the performance is the content. You sang the hook well, the guitar was in tune, the light was right, and the sound came out thin, hissy and lopsided because a phone microphone recorded the room as loudly as it recorded you. Re-shooting loses the take. Cleaning it keeps the take and fixes what the microphone got wrong.
What a Reel's audio needs
Reels are heard on phone speakers and earbuds, mostly in the first second, with the sound often off until something earns a tap. Three things decide whether yours holds attention once it is on:
- A clear voice. The words and the melody sit in front. Hiss, fan noise and room rumble sit far behind.
- A balanced instrument. The guitar, keys or beat supports the voice instead of burying it or vanishing under it.
- Density on a small speaker. A mastered Reel sounds full on a phone. An unmastered one sounds quiet next to the clip before it in the feed.
Each of those is a step in Veena, and the steps below take them in order.
Clean audio for Instagram Reels in Veena, step by step
- Import the video. Drag the file onto the arrangement or press Upload in the transport. Veena reads MP4, M4V, MOV, WebM, MKV and AVI, so a clip saved from your phone's camera roll comes straight in.
- Separate Audio. Right-click the video clip and choose Separate Audio. The sound becomes its own audio clip, lined up with the picture, and you can edit it like any recording.
- Split the sound into stems. Stop playback, right-click the audio clip and choose Separate into Stems. In 45 to 120 seconds for a full song, four time-aligned tracks appear: vocals, drums, bass and other. A voice-and-guitar Reel lands as a vocal stem plus the guitar in the other stem, which is what lets you balance them separately.
- Open Mix & Master and name the parts. On Parts, tag the voice as Lead vocal and tag the instrument stems by what they are. Set the vocal's importance forward if the words carry the Reel.
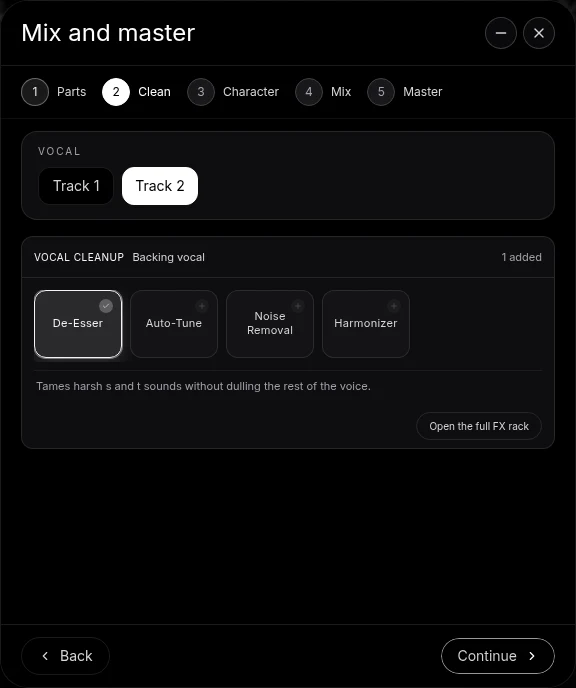
- Clean the vocal. Press Continue to reach Clean. Add Noise Removal for background noise and De-Esser for sharp S and T sounds. Auto-Tune is there for pitch, and Harmonizer adds extra voices when the hook wants them. Open the full FX rack to turn the knobs and compare each effect on and off.
- AutoMix. On Mix, choose a Genre and a Space. For a close, intimate Reel pick Dry or Ambience; for a bigger chorus pick Room or Plate. Press AutoMix and Veena sets levels, pan, effects and the shared space across your editable tracks.
- Master the project. Pause playback, open the Master step and press Master project. Veena measures the mix and installs Match EQ followed by Limiter on the master bus. The FX Chain switch in Master FX compares the mastered and unmastered sound.
- Export the MP4. Click your avatar, choose Export, pick MP4 and export. You get the video with your mixed audio, ready to post.
The full method for any video sits on the clean up audio in a video page, and the AI mixing assistant page covers the mixing tools in depth.
Fix the three sounds Reels get wrong
Hiss and room noise. Noise Removal on the vocal stem targets the steady background under your voice. Set it while the quiet parts play, between phrases, since that is where noise is most obvious. For a hum or a rumble below the voice, add a Filter or the 8-Band EQ to the track and cut the lowest frequencies, below where your voice and instrument live.
Harsh consonants. Phone microphones exaggerate S, T and SH sounds, and earbuds exaggerate them again. De-Esser on the Clean stage turns those spikes down without dulling the whole voice. The de-ess vocals in a video guide goes deeper.
Voice and instrument out of balance. One phone, one take, and the guitar sits too loud or too quiet. With the voice on the vocal stem and the guitar on the other stem, each has its own fader, its own EQ and its own effects. The balance vocals and guitar recorded on one mic guide walks through it in detail.
Keep the picture in sync
Separate Audio places the sound directly under the picture, and stem separation keeps every stem time-aligned with it. Leave the clips where they land and the lips and the strums stay on time. If you move a clip to tidy the timeline, turn on Grid Snap and drag it back to its starting bar before you export, then play the first few seconds and watch the mouth on a hard consonant.
Check it where your audience hears it
Before posting, play the export on your phone's speaker and on earbuds. Listen for three things: every word clear at low volume, the instrument present without fighting the voice, and the level close to the Reels around it. If the voice still sits back, raise the Lead vocal's importance on Parts and press AutoMix again. If the master feels too squeezed, open Master FX and lower the Limiter's drive.
Let CoProducer do the whole pass
Every step above can come from one sentence. Open the CoProducer panel and describe the outcome: what the video is, which part is the lead and how it should feel. CoProducer reaches the same Mix & Master surface as the manual buttons, and its changes appear as editable cards, so a follow-up like "a little less reverb on the voice" adjusts the pass without starting over.
Paste this into CoProducer:
"Clean and mix the audio in this Reel: it's an acoustic pop cover around 90 BPM, voice and acoustic guitar on one phone mic. Split it into stems, tag the vocal as Lead vocal, run Noise Removal and a light De-Esser on it, keep the guitar warm and just under the voice, add a short Room, AutoMix for acoustic pop, then master the project so it sounds full on a phone speaker."
Related reading: clean up audio in a video · clean audio for TikTok music videos · improve phone video audio · make acoustic cover videos sound better · AI mixing assistant
Try this in Veena
Clean and mix the audio in this Reel: it's an acoustic pop cover around 90 BPM, voice and acoustic guitar on one phone mic. Split it into stems, tag the vocal as Lead vocal, run Noise Removal and a light De-Esser on it, keep the guitar warm and just under the voice, add a short Room, AutoMix for acoustic pop, then master the project so it sounds full on a phone speaker.
Frequently asked questions
How do I clean audio for Instagram Reels music videos?
Import the Reel into Veena, right-click the video and choose Separate Audio, then split the sound into vocals, drums, bass and other. In Mix & Master, tag the voice as Lead vocal, use Clean for Noise Removal and De-Esser, press AutoMix and Master project, then export an MP4 with your picture and the new mix. It is free in your browser.
Can I improve the audio of a Reel without re-recording it?
Yes. Veena works on the sound you already captured. It separates the clip's audio from the picture, splits it into four stems, and lets you lower background noise, tame harsh consonants, rebalance the voice against the instrument and master the result. The video stays on the timeline beside the audio, so the export keeps your picture in place.
What format should I export a Reel in from Veena?
Choose MP4 in Veena's Export tab. MP4 appears when the project contains a video clip, and it gives you the video with your mixed audio in one file, ready to upload to Instagram. If you also want the sound on its own, export a 24-bit, 48 kHz WAV or a 320 kbps MP3 from the same project.
Can CoProducer clean my Reel audio for me?
Yes. Describe the result in plain English, such as 'clean my vocal, keep the guitar under it and master it for a phone', and Veena's CoProducer runs the same Mix & Master workflow as the manual buttons. Every change lands as an editable effect card, so you can open a track's FX and adjust any setting it chose.
Is it free to clean Reel audio in Veena?
Yes. Importing video, Separate Audio, stem separation from the right-click menu, the Mix & Master flow and MP4 export are all part of Veena's free plan, with no watermark and no cap on exports. Veena Pro, at $20 a month, removes the daily CoProducer request cap and unlocks the premium models.
Meet your personal music producer
Free, in your browser. Describe the song you want and CoProducer builds it with you.
Make music free